When you are dealing with a lot of inventory like we have for sports cards, it is essential to keep it structured. When you are using Kronocard to scan all cards, get assigned a unique ID (SKU). That id is, in fact, the position of your card in your inventory. When you scan your cards, all the images are linked in a database with that unique id. That means that at any time when you are looking for a card in your inventory Kronocard will tell you where you can find it quickly with the exact position in your inventory. The id (SKU) of that card will be available at multiple places in Kronocard, on client invoices, online in the description and also on your eBay listing description if you are using Kronocard to list on eBay too.
Where it starts:
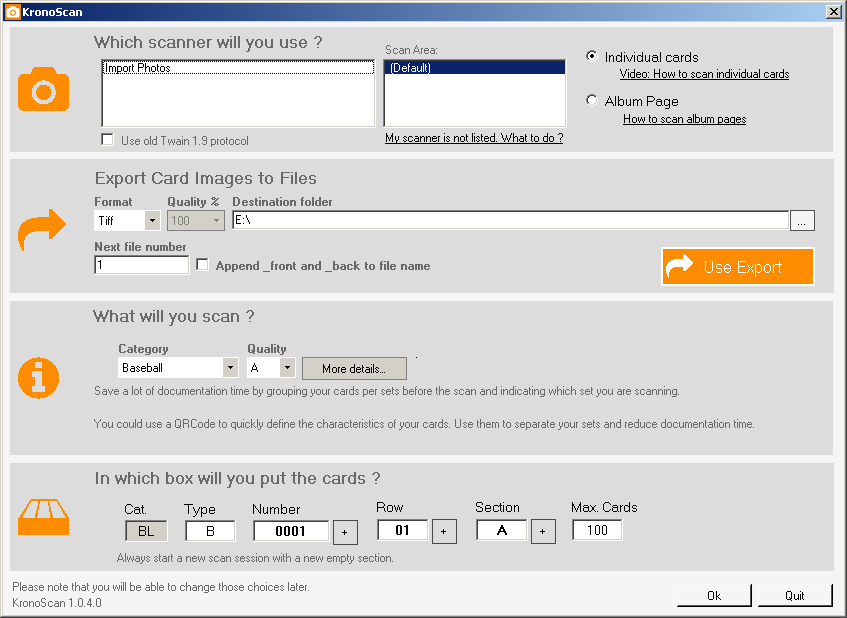
When you start a scanning session in Kronocard, the first panel that you see is something like this. You select your scanner in the list at the top, and you choose the category. In that case, we decided Baseball because we are scanning baseball cards.

The part of the panel that we are interested in this article is this one. This is the most crucial part of Kronocard!
This represents how the unique id (SKU) of the cards scanned will be applied.
The first element in that panel is labelled Cat. for a category. If you change the category like us for Baseball the Cat. for the id will start with BL. Each category will have a unique two letters value.
The next label is Type. This is where you can change the text for anything to fit your way of storing all your inventory. By default, it's B for the box, but you can decide that you will have A for cards in room A, B for another room, C for your binders, D for store display, etc. You can do what you want with that part.
The next one is a number that, in our case, the box number. So you probably have many boxes in your inventory, so you will change that number only when you're box 0001 is full, and you are starting a new box.
The next one is Row, this is to identify rows of your box when you have boxes with multiple rows. When you start with a new box, this number must be 0001 but as soon as you have filled a row, you change it to 0002, etc.
The section now... What is a section in a box... What we designed is that when you need to pull out a card from a box if you need to look at all the cards in a row, it will slow you down a lot. When you are scanning cards, at some point the software will tell you that you reached the Max Cards count. That Max Cards count is the value to the right of the Section field. By default, we are considering that 50 cards per section work best, but you can change it as needed. The lower the value, the faster it will be to find cards in your box BUT, if you go under 50 cards, you will need to have more little separator between sections. Yes because by default boxes don't have a section you need to insert a little separator between each section in each row as you can see in the next image. Please also note that when you pull out 50 cards or 100 cards from your box to pull a card, it's a lot easier to handle them. Having more cards in your hand can result in dropping some, and they will get damaged.
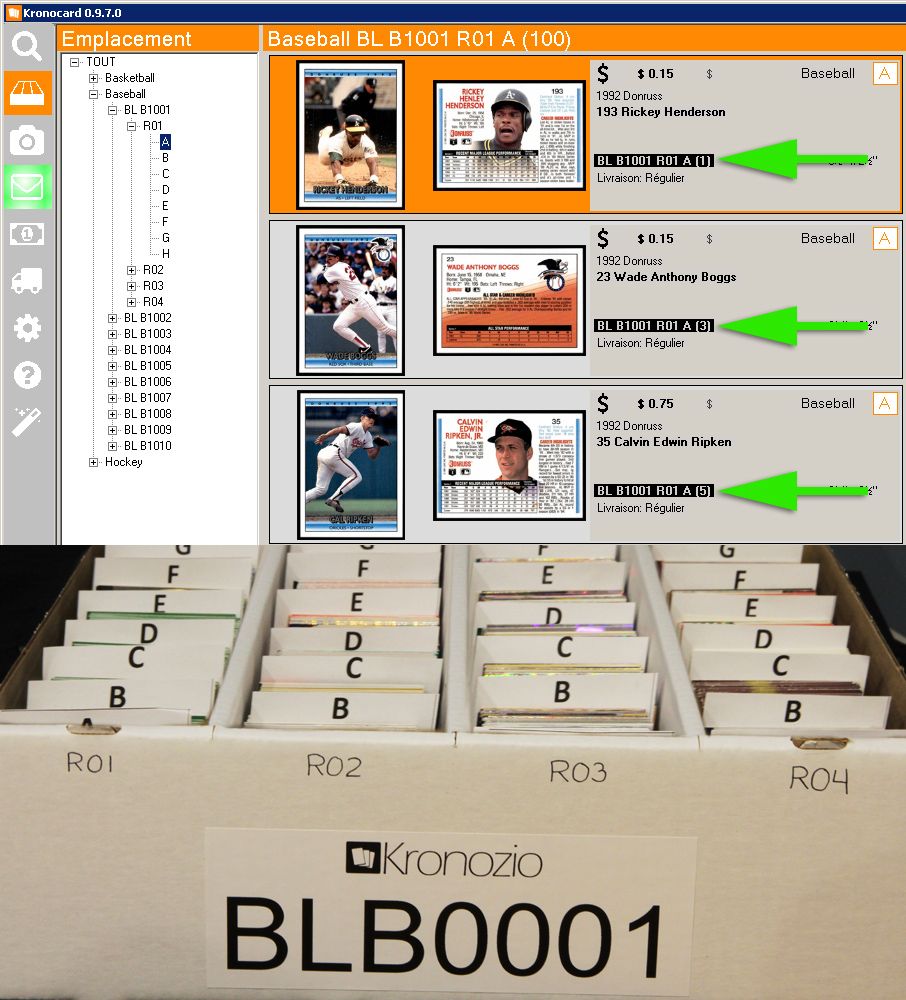
Look at that image, on the top right part, you can see that each card have is a unique id (SKU) that is the position of the card in the inventory. Bellow the Kronocard part, you can see the final result of the structure. So the box is labelled BLB0001 because this is our first box in our inventory for baseball. Now within Kronocard, I know that if I need to pull out the 1992 Donruss Calvin Edwin Ripken card from my inventory, Kronocard will show me that I can find it in box BLB0001 in the first row in section A and it's the 5th cards!!
So in our case, our entire inventory is based on a stack of 100 cards between section. There is no problem to have a section that you stopped at 20 cards and the next one has 100. Also remember that you can always add new scanned cards to any free space in any box, row, section. So each time you're ready to save your stack Kronocard will tell you where you need to put the stack. If you realize that that location is wrong, you can still cancel and change it using the button at the bottom left corner. The id (SKU) is applied only when you save.

You can have the information about the separators that you can print at home here.
We also have a video that demonstrates a scanning session, and at the end, it is also showing the user placing cards in the box in row 1 section A. You can start the video at 6min 30sec to see that part: Video Here
Was this article helpful?
That’s Great!
Thank you for your feedback
Sorry! We couldn't be helpful
Thank you for your feedback
Feedback sent
We appreciate your effort and will try to fix the article